↧
Leatherworking Tool List
↧
Red Boot Binder Sleepsack: The Final Cut
This is the final boot-binder sleepsack, made in the same leather as the first (a stunning, red, lamb-tan cowhide), but with some minor differences and refinements.
![]() |
This sack features an open mouth and nipple access, with the neck pattern slightly shortened in front. |
![]() |
I went with red thread topstitching throughout (instead of black) for a cleaner look. |
![]() |
The 3 sliders on the rear zipper make it possible to open the zipper anywhere along its length. |
![]() |
And a few other tweaks to the pattern for the ultimate tight fit... |
Overall I'm pretty happy with how this project turned out. It's been a long journey from initial sketch to the final product, but I'm glad to have this restraint brought from the realm of fantasy into reality. Thanks to everyone who has sent messages of encouragement and support along the way, both here and on fetlife. I do appreciate it!
↧
↧
The Journey by Monica Menez
Came across a short film by fashion photographer Monica Menez that prominently features the female lead wearing those (oh-so-lovely) tall Gucci python boots from the current fall season. I just had to share this for all my fellow boot-lovers out there...
![]() |
A still from the movie. Yes, every boot fetishist hopes to see this whenever a car door opens... |
The Journey from MONICA MENEZ on Vimeo.
The actress does a pretty amazing job of making the skyscraper heels seem almost manageable. Bravo to her!
Straight off the runway... |
Thanks to my friends over at Trendland, for the link to this visual treat.
↧
Hysterical Literature by Clayton Cubitt
↧
Incredible Japanese bondage by THL
Huge thanks goes out to my friend sammy for turning me on to THL, a photographer doing some jaw-droppingly, mind-bending, flat-out beautiful work... If you are a fan of Asian cuties tied very well (and lit well, and photographed beautifully) and in fetish-y garb, STOP NOW and go check out his site (or his tumblr) this instant. Come back and thank me later.
Here are just a few of the many (oh so many!) images that will have you drooling (you're welcome!):
Every one of his images is so good it makes me want to cry. The girls he shoots are so pretty! How does he get such wholesome-looking Japanese (I'm assuming) girl-next-door types to endure such kinky torments? "Would you like to play dress-up in head-to-toe rubber and ballet boots with a gas-mask my dear?" Of course they say, only too happy to oblige in THL's amazing life.
I take photos myself, so I appreciate all the work that goes into getting an image like this:
The rigging, the lighting, the location-shooting. My question is "How does he get so many beautiful shots, each so unique and different?" He'll do an entire setup, in a particular location, with a beautiful model, and then he is posting just a single, solitary shot. Damn!
Obviously, this guy THL has an amazing eye, and a beautiful, willing lovely girl(s) to model for him. But man, what a way with the lighting and setups... One beautiful image after another.
Even the straightforward shots of his fetish gear are pure artistry...
↧
↧
How To: Make A Boot Binder Sleepsack - PART I
These posts will cover every step of my process for making the boot-binder sleepsack. Let's get started...
First, cut out all your parts (I use L+R as shorthand Left and Right):
L+R front panels
L+R Rear panels
L+R Shoulders
L+R Foot pocket side
Foot pocket bottom
High Heel pocket cap
L+R internal sleeves
Long Tongue (for rear zipper)
Short tongue (for front-access zipper)
Hood L+R front panels
Hood L+R rear top panels
Hood L+R bottom panels
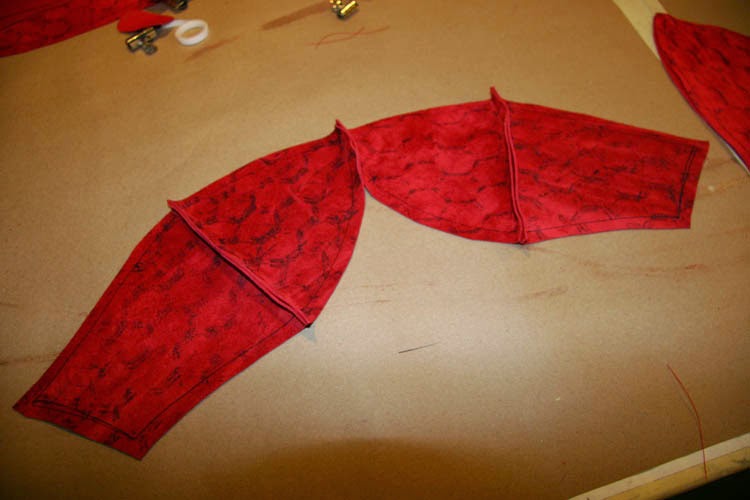
Clip and sew darts on L+R shoulders and L+R rear panels.![]() |
Clipped. |
![]() |
Sewn. |
![]() |
Glued. |
![]() |
And flattened. |
![]() |
Ready for the next step... |
Remember to leave an opening for the zipper (it's all too easy to just keep sewing)! Follow marks indicated on the pattern.
Glue and flatten entire front seam (including the part where the zipper will go).
Flattened seam from the front:
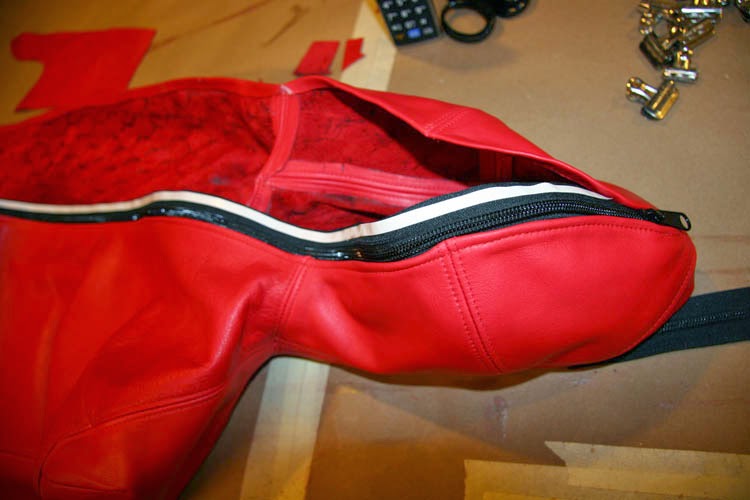
Keep that transition smooth around the zipper opening.From the inside: use double-sided tape to hold the zipper in position for sewing.
Use another strip to hold the tongue in place.
Topstitch the front seam through the zipper and tongue. Just remember to fold back the tongue when sewing the second side, otherwise you'll sew it completely shut. That would be a problem...
Using the tape and sewing both the zipper and tongue at the same time gives the front seam a very clean look: Very nice...
Next up: the foot pocket. We begin with the L+R foot pocket side panels.
These are clipped and sewn at the front seam, flattened and topstitched.
Clip and sew foot pocket to the L+R front panels, aligned on the center seam.
Sew it up...
...glue,...flatten,
(a view of the inside)...and topstitch.
This part of the binder is so cool looking... Love the foot pocket!
Next, we'll clip and sew the Left + Right rear panels to the L + R front panels.
I start aligning at the shoulders and work carefully along the way to make sure things line up. When aligning long pieces of stretchy material like leather, it's easy for things to not align. You want to take you time to ensure symmetry between the two sides.
Sew those sides to the front panels once you're happy with the clips.
Glue...
(lots of glue on these side seams...)
...flatten and topstitch. The foot pocket now looks like this: 
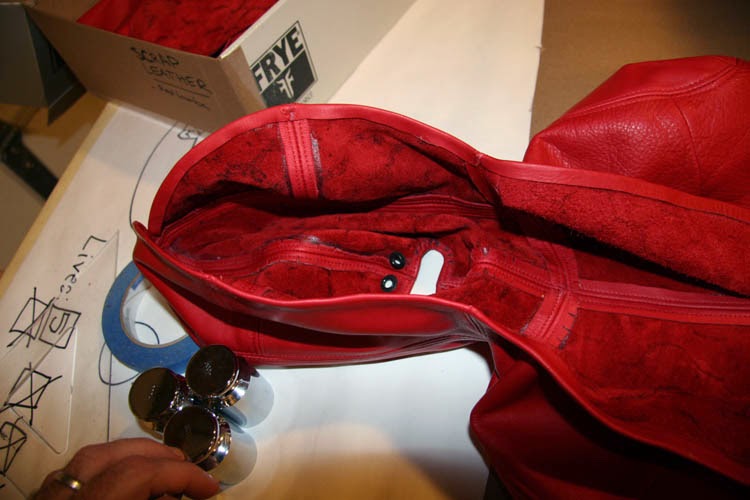
Next up: the shoulders. Remember these from step 1?
Clip those puppies in place. Just like the side seams, the shoulders can be tricky to clip, but for a different reason: in this case you are attaching a curved shape (the shoulder) to a flatter shape (the body of the binder), so you are mating two different things together. Take your time to get things aligned just right before sewing. You know the drill: glue, flatten and topstich the shoulders.
As you can see, I use a couple of boards clamped to my workbench to hold the piece while the glue dries.
It can just hang out for a few minutes while the glue sets up.
Once flattened and sewn, we have the neck hole coming together.
I topstitched this seam as well, although you don't have to if you want a cleaner look. On this sack, I'm using matching red thread, so it's a very neat and subtle look. Very pretty with this leather.
Now it's time to close up the bottom of the foot pocket. The piece gets clipped and sewn, aligning on the front center seam.
Once sewn, you end up with this: Next, we're going to sew a couple of inches of the part that will become the heel pocket.
Once that's done, the heel pocket end gets clipped in place.
This little piece is actually the hardest part of the whole thing to sew.
It's a little tube that has to be capped just right, a tiny little piece.
I end up putting some foam in the pocket to help it hold its shape while I'm running it through the machine.
That's it for part one. Next up: making the hood!
↧
How To: Make a Boot Binder Sleepsack - PART II
In this post we'll make the hood and attach it to the body of the sack. We begin with our six hood parts: L+R front panels, L+R rear top and L+R rear bottom panels.
The fronts are clipped together for sewing, along with the top and bottom halves for the rear panels.
This center seam in the rear panel really helps make the hood take on the spherical shape of the back of the head, especially with a slightly heavier leather like this lamb-tan. The two rear panels are then sewn together an inch or so at the top.
These 3 seams get glued and flattened. I use the head form to start molding and shaping the hood. To me it's the most important part, and it has to fit perfectly.
Working with the fitting hammer, scissors and razors, the seam is flattened and the leather around the mouth opening is folded back. You are sculpting the leather, almost like clay.
Take your time to work it, and get a nice smooth opening. Trim, undercut and skive to get the seam as flat and smooth as possible.
Once I'm happy with the shape of the mouth, the front seam is topstitched. Can you see the path I took around the mouth? I think having no crossover of the center seam kind of gives the mouth a cleaner look.
With the front of the hood complete (you can see I punched holes and set grommets for the nose), it's time to join the front of the hood to the back.
Use clips to hold the front to back, aligning on the center seam.
Once sewn, it's on to the wood head form for the glue-up of the center seam. I find it's easier to glue neatly on the form, and the hood is held in tightly in place with painter's tape. I also have been gluing first, and cutting the small darts after the glue has set up. Makes for a neater glue job...
Once set up, the seam is flattened...
I like to leave the hood on the form overnight to stretch it out a bit...
The next day, we have a hood ready to attach to the sleepsack body.
Working inside-out, we align the hood on the center seam.
This is probably the most nerve-wracking to sew, as the different shapes coming together present a challenge. And it's a highly visible connection where the hood meets the body.It has to be perfect, and at this stage any screw-up has the potential to ruin both the body and the hood. No margin for error, really...
Fortunately, it turned out okay...Once it's topstitched, everything got a little brighter for me. Just stunning... And we're almost there.
↧
How To: Make a Boot Binder Sleepsack - PART III
Time to finish up the sack. First we need to fine-tune the connection between the hood and the body to get a smooth line. You can see in the image below, the hood seam needs to come in about 1/4 inch to meet the body seam. I usually try to have a little extra here, as it's better to trim down to size than to come up short...
Once the lines are drawn and seam allowances cut, the entire rear opening is glued and turned in along the edge. To the top of the hood:
Glue is applied, allowed to set up, and the whole seam is turned and flattened with a mallet.
Lately I've been sewing in the first half of the zipper without any tape or clips holding it in place. I just cut the zipper a bit oversized, separate it, and sew in the first half freehand.
I also created a zipper stop on this piece, which allows me to have a neater finish (and less bulk) at the beginning and end of the zipper opening.
I cut small rectangles of leather, and skived them down to minimize bulk and create a clean turned edge.
These are sewn to the end of the zipper.
And held in place with double-sided tape. I don't actually sew these to the zipper until it's partially sewn in. That way I can position it precisely based on what is needed.
For the second side of the zipper, I'm using double-sided tape to hold the it in position.
This allows me to close up the entire second side (kind of a dry-fit), and make sure the leather on both sides of is properly aligned. Once I'm happy with the placement of the 2nd side of the zipper, I carefully unzip and use binder clips to hold it in place while sewing. The clips provide additional insurance that the zipper won't move out of position while being fed through the sewing machine.
It seems to work pretty well for me so far... Next, long strips are cut for the rear tongue.
The tongue is also held in place with double-sided tape, and topstitched in place.
This sack has two additional sliders, so it can be opened anywhere you like along the rear.
Next up: two internal sleeves with turned and sewn edges.
These are positioned according to the pattern and sewn in place: first from the inside following the line.
And second: topstitched from the outside, using your first line of stitching as a guide. Instead of backstitching, I just cut the threads long and tied them from the inside. Gives a neater look...
And finally, this sleepsack features nipple access. Circle shapes cut out and placed in just the right location...
These are held in place with double-sided tape, and topstitched. Very, very carefully - it's about as front-and-center as any stitching you'll do. Highly visible. So, that brings to a close our sleepsack project.
Hopefully I've given some ideas you may use for your own projects.
The ability to make things to your own specifications, and to fine-tune the design to meet your requirements is what custom leather crafting is all about. ↧
The End is Near?
Well, it's been fun while it lasted folks, but according to an email I received today from Google, they're getting ready to crack down on blogs with sexual content... so this may be one of the last posts you will see from me. I haven't had a chance to decide what comes next, but at this point this particular blog's days are numbered. Just though I'd give you a head-up in case you never got around to downloading that hood pattern PDF or those f-suit images...
↧
↧
Dark Babies photos by Karen Hsiao
My friend and artistic collaborator Karen Hsiao sent over some images she created recently. She calls them her Dark Babies. Oh, I like these...
That black lipstick...
Prints are available at her store.
We're working on an entire new series that unfortunately I have to keep under wraps for now, but I can't wait until it comes to fruition. If my blog does go away, you can find my work on Karen's site. We still have lots of things left to do together!
↧
Some Great News from the Googleplex
Looks like Google is giving some thought to not shutting down blogs just because they have adult content, but being more selective about only blocking sites that violate their policy against commercial porn content on their blog platform.
It's a happy day (and a big relief) for me and the future of this blog. Many thanks for every single person who reached out with messages of support and offers to help me move the content somewhere else!
Happily, it's not the end. There's lots more to come...
↧
Boot Binder Sleepsack Pattern
↧
Bitchsuits Part II - Tumblr galleries
I can tell from the traffic of visitors to my blog that there are lots of "bitchsuit" fans out there. Technically, I've never tried making one, although sometimes I'll see the f-suits I make lumped in together with them. Without getting too far into it, the primary difference from a design standpoint, is the f-suit is more for restraint and play in a supine position, while true bitchsuit designs are geared towards having your pet slavegirl walking (or crawling around, more specifically) on all fours.
There are many better sources out there for galleries of bitchsuit images, and I thought I'd share a couple with you that I recently came across: this one and that other one. (Probably from something my friend sammy posted.) Lots of great stuff to see, and many images I haven't seen before. (And I thought I'd seen everything...) Go have a look!
↧
↧
Animated Mummy Sack Tutorial
I found an awesome tutorial about making a life-size animated, struggling bodybagged victim for your front yard Halloween display. It just looked like a lot of fun, and the tape strapping and trash bag look could definitely add atmosphere to your next fetish party. It's not too hard to make, either. I could just see a whole front yard filled with these guys... C'mon, the neighbors already know you're a little weird.
Of course, it's not a sexy as the real struggling Mina over at Restricted Senses.
But we all don't have a Mina, do we? (Also, would you really our beautiful leather sleepsack used on the front lawn? I think not...)
↧
Robert Bishop Archive on Tumblr
I just came across an amazing archive of Robert Bishop's artwork completely by accident. It all started when I read an article about how the painter Mark Rothko had died of suicide. Van Gogh also famously killed himself, which got me thinking: "How many other famous visual artists have committed suicide?" I go to the Wikkipedia page, and there in the first column is Robert Bishop! I had no idea... The Wikki entry on Robert was a surprise, and at the bottom was a link to a tumblr account dedicated exclusively to his work.
It's easy to go down the rabbit hole if you visit the tumblr, and I suggest you go only when you have a decent amount of time to explore. There is a ton of work there, and it's really well presented. Most of the original artwork no longer exists, so it's only through the work of dedicated fans who have tracked down and scanned the art from magazines and old catalogs that the images are being preserved.
There are many, many images of things (scenarios, poses, restraints) that just resonate through my mind quite strongly. It's great to see familiar ideas, like the square armbinder (box-tie) type restraint.
Or something quite close to the bondage booties I did a while back, complete with front lacing and D-rings at the toes.
Something close to the leg pockets I've made...
The designs for restraints are carefully thought out and rendered, and in many cases are things that could be actually built in the real world.
Of course, for many you'd need limber, flexible models.
And let's just say that Mr. Bishop seemed to enjoy the ample bosom.
Just stunning artistry, and an incredible feel for female anatomy.
A fetishist's delight in shiny textures and deeply-set ball gags.
Of course, super tall boots...
Leather harnesses...
Beautiful headgear...
Even a few straitjackets. This drawing is really lovely I think:
Even the inspiration for InSex's fiberglass hard case? Possibly...
Just so much stunning work. Some hood illustrations I'd never seen before:
Even a self-portrait. Amazing to think that he did all this work by the age of 46...
Definitely check it out here when you have a chance.
↧
Vintage ad featuring Straitjacketed beauty...
↧
Hot Stuff
We all know the net is just a never-ending cornucopia of sensual images, and there are so many people better at doing image reposting than I am. But I had to share a set with you guys, because if you haven't seen 'em... you're missing something. Think of it like a current mood board, or a repository of inspirational wonderfulness.
I always love to see what my friends are looking at too, and sammy, PSWKUA and Restricted Senses, all have fantastic tumblrs happening. Check 'em out when you have a chance. Especially if you're into tasteful and intense fetish bondage (Restricted Senses), Asian cutie pies with some very dirty minds and some potty play (sammy), and creative rubbery bondage scenarios (PSWKUA).
↧
↧
Padded Hood Construction
In this post I'm going to take you through my process for making a foam-padded hood. This is actually two leather hoods: one inside the other with a foam layer in between. The foam provides both an overall tightness, and adds to the sensory-deprivation of the poor victim/lucky slave trapped inside. Also, it looks really cool! Let's get started.
I begin with my foam pattern parts, cut out from the same pattern I use for the outer hood. It's about 1" thick, cut out with scissors.
There's an offset pattern for this project, as this hood is going to attach to a butterfly straitjacket which will have both a zipper and lacing closure. There is about a 1 inch allowance for the lacing strip. More on that later...
I layout my parts on the outer leather, which is a 1.2mm thick soft cow hide.
Here you see all the parts for the outer layer. Kind'a forms a funny-looking face.
For the inner hood, I'm using the classic four-panel pattern that can be found here, made in a soft lamb leather (about 0.7mm thick). I'll only use the front and rear panels (no tongue parts) as the tongue will be created for the entire jacket, not just the hood. More on that later too...
The weirdest thing about this inner hood is I'm going to build it inside out. I would normally have the seam on the inside of the hood. But since I don't want the seam to press on my slave's pretty little face, I'm going to make the seam on the outside of the hood.
This isn't usually possible, as it would look kind of funny to have the seam on the outside.
But since the "outside" of this hood is going to be hidden by a layer of foam (and the outer hood), it's the best way to go. I had to really be careful, because I'm so used to the suede side of the workpiece being the one facing out during sewing. All the marks for the pattern were traced on the "good" shiny side of the leather as well.
So here I'm done with sewing the inner hood together.
With the funny seam allowance sticking out all over...
But it's nice and smooth on the inside. She's going to love it!
I decide to trim the seam allowance to a bit more than 1/8".
I put it on the hood form.
And from here I can brush on some glue along the seams.
I gently pry the seams apart (a stitch ripper helps)...
...and flatten the seam all along its length.
And here she is all smoothed out.
It should feel nice and smooth on the inside.
Now for the foam parts. These get hit with a generous coat of spray-adhesive.
I decided to spray the inner leather hood as well: I don't want anything moving around once the foam is in place.
Plus, it has to stand up to the (pretty tight) outer leather hood being pulled over it. There's a lot of friction between the foam and the leather, so don't skimp on the adhesive.
I start with the face piece. This has a center alignment mark from the pattern, which helps make sure it's in the right place.
Next, I add in the side panels, being sure to tuck the edges in so the surface is nice and smooth.
There's also a dart in the back of the side panels to help it create the cup or bowl-shape of the base of the skull.
Coax the foam around, and you can make the seam and dart pretty much go away.
It takes some trimming, but the rear foam panels are positioned last.
We have a good-looking foam-covered hood at this point. Every thing tucked in, and seamless, ready for the outer heavy leather cover.
This is the trickiest part of the whole operation: get the tight outer hood over the foam without pulling anything out of place. It's a really tight fit, so I'm glad I used all that spray glue.
Once it's all tugged and pulled into position, I'm pretty happy with the way it is looking. That smooth curved contour is really nice and sculptural, and the contrast between the big head and tiny neck is really sexy.
Can't wait to see it on.
That's it for now... Next time: closing the back, and adding it to the jacket.
↧
Padded Hood Construction PART II
In this post I'll attach the padded hood to the butterfly straitjacket, finish setting the rear zipper and lacing panel in place. We left off with the outer hood wrapped over the inner hood and foam inter-layer.
Unfortunately, as good as this looks, I skipped a step. We really should sew the collar to the outer hood before stretching it over the form. So, off with the outer hood, and let's take care of that collar, shall we?
Align the collar on the centerline, and clip in place for sewing. I find this much easier to do on the post-bed sewing machine, both for the initial stitching, and the topstitching. It allows the hood to keep it's shape while going through.
It would have to be flattened out a bit to go through the flatbed. And at this stage, I don't want to pull that foam or inner hood out of alignment. (Making closed shapes like this is exactly why I spent the money to buy a dedicated post-bed machine.)
Once the collar is attached the inner and outer hoods are clipped together at the rear. I topstitch all around this opening, tying the two hoods together, and locking the foam parts in place.
You can see in this photo a 1" gap at the rear, created to allow the lacing strip to fit nicely in the rear of the hood.
Now I want to cut all the long strips to complete the project. There are four: one lacing strip, the edge-band for the waist, the zipper tongue, and lacing panel tongue.
I managed to squeeze this entire project out of a 20 square foot remnant. But I did end up having to piece together some of these long strips from shorter pieces. I would recommend more like 30 to 35 square feet for a project like this, to have no seams, and have better choice when it comes to placing parts on the hide.
Now it's time to clip the hood to the body of the straitjacket.
Once sewn, those seams get glued and flattened. And we have a nice looking attached hood!
I love this jacket. It's so fun to see the project come together...
Now for the rear zipper/lacing panel. This technique is evolving for me, and lately I've been using double-sided tape to hold parts together during sewing. It can really help with parts like this, where you have multiple pieces held together with one row of stitching. Here we have (from top to bottom) the lacing strip, the zipper, and the part that will become the tongue on the lacing side.
I first put down a line of double-sided tape on the lacing tongue.
The zipper is attached to that, and a second line of tape is laid down on the zipper to hold the lacing strip in place.
I sew a small tab of leather to the end of the zipper. It acts as a stop, and gives me something to sew through when setting the zipper into the hood.
The lacing strip (which has been skived down to taper near the end) is held in place with the double-sided tape. This whole sandwich of lacing strip, zipper and lacing tongue are all run through at one time, sewing them all together.
The strip we create will get sewn in to the rear of the jacket, but I'm following my usual technique for locking the strip into the rolled edge. To do this, I have to start the rolled edge, and insert the strip half-way through.
I can post a more detailed description of that if anyone's interested...
Our lacing/zipper strip gets some double-sided tape to hold it in place during sewing.
I tend to do a strip along the top as well, to keep it properly aligned during sewing.
After sewing the strip in place, this is the final result: A zipped, laced rear opening.
The lacing is great for adjusting the tightness and intensity. The zipper makes getting in and out a lot quicker and easier.
And, you'll be happy to note that I did provide a breathing hole.
That about wraps up this project folks. Thanks for following along!
Time for some real-world testing…
↧
Fei Fei Sun in TALL boots, gloves and fur - Vogue Italia
A stunning pictorial by Mert and Marcus for Italian Vogue's 2015 China issue featuring Fei Fei Sun. You can see the whole set here on Asian Models Blog. I think I'm ready for total Asian domination. Yes, please!
↧